
Alright, so today I’m gonna spill the beans on my “easy updos” adventure. You know, those hairstyles that look like you spent hours on them, but actually took, like, five minutes? Yeah, those!
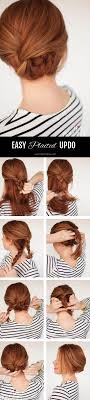
First off, I started with day-old hair. Clean hair is slippery, and updos just don’t hold as well. So, I skipped the shampoo and dove right in. I grabbed a texturizing spray – the kind that gives your hair a little grit – and spritzed it all over. Think of it as hairspray’s cool cousin. I really worked it in with my fingers, tousling it to give it some volume.
Next up, the actual “up” part. I went for a messy bun, because honestly, who has time for perfection? I flipped my head upside down and gathered all my hair like I was making a ponytail at the crown of my head. Then, I twisted it loosely – not too tight, we’re going for effortless here – and wrapped it around the base to form a bun. I secured it with a few bobby pins, strategically placed to hold everything in place. Don’t be shy with the pins; they’re your best friend in this situation. The goal is secure, not pretty.
Here’s the trick to making it look fancy: pulling out a few strands. I gently tugged on small pieces of hair around my face and at the nape of my neck to soften the look. Think “I woke up like this,” even if you definitely didn’t. I also pinched the bun itself to make it a bit bigger and more voluminous. This is where you can really customize it to your liking – make it as messy or as polished as you want.
After the bun, I have some hairs dropping down, so I just grab a few more bobby pins to fix them. I don’t like using hairspray, but sometimes I would spray a bit of hairspray to keep the updo last longer.
Finally, a quick spritz of hairspray to keep everything in place, and that’s it! Easy peasy. Honestly, the whole thing took less than five minutes, and it looks like I actually tried. Win-win!

I also tried another one, the “twisted crown” updo. This one’s a little more involved, but still super easy. I started by parting my hair down the middle. Then, I took a section of hair from one side and started twisting it away from my face, adding more hair as I went along, like a French braid, but just twisting instead of braiding. I continued twisting until I reached the back of my head and secured it with a bobby pin. I repeated the same process on the other side, twisting the hair towards the back of my head and securing it with a pin. Then, I took the two twists and crisscrossed them at the back of my head, tucking the ends under each other and pinning them in place. Again, it’s all about strategic pin placement.
The twisted crown thing I always feel like it won’t hold, but it actually does. So I would suggest that maybe try doing it when you got time, or when you are just hanging out at home, you would know how long will the twisted crown last.
Honestly, updos don’t have to be complicated. With a little practice and a few bobby pins, you can create some seriously chic hairstyles in minutes. And the best part? They’re perfect for hiding dirty hair!